


This month, the Hustle Crew and I are learning how to build and then monetize a blog from the ground up. If you know absolutely nothing about blogging, you will want to follow along this month as we build our money making blogs. Even if you’re not interested in making money from your blog, this tutorial will still show 

Blogs have evolved from miniature websites featuring photos of cats and kids into full-fledged and large businesses. Some of the most visited sites in the world are actually built in blog format and have spawned million dollar businesses of their own.
One of the most popular blogs that come to mind is TMZ. They constantly publish stories online throughout the day which is then featured on their television show which plays at least twice each day. Stories first featured on TMZ are often used as sources for the gossip and entertainment portion of your local television news, making it a powerhouse in pop culture.
Think about it, you’re here reading my blog right now! This blog has been around since 2009, so, blogging is clearly going absolutely nowhere. Many of my friends run their blogs as their full-time businesses, and if you’ve read the income reports that I used to do years ago, you’ll realize that supplementing your income is as close as one blog away.
You can start your blog for free by having it on a free platform. If your website is mynamehere.somethingelse.com, you are on a shared platform. Having your own website that is hosted on servers that you pay for is critical to monetizing your blog. If your website is on Blogger or Blogher or WordPress, it will not appear to be as professional and you may be restricted by their terms of service. When your website is on its own little space on the web, you can do just about whatever you want with it.
There are a ton of hosting companies out there. By the way, hosts are just companies that have the servers that will contain the images and information that will make up your website. You’ve probably heard of GoDaddy as a popular host but today we will explore a hosting company that I have used and is super easy for beginners to use as well.
In this post, I’ll be teaching you the very basics of setting up your blog with Blue Host. I am using Blue Host because they have integrated services which makes it supremely easy to get started if you know absolutely nothing. On top of being really cheap (as low as only $3.95 each month), they include a domain for free, you can install WordPress with a quick click, and they have 24-hour support.
You should know that I am a Blue Host affiliate but I also have some of my own sites through Blue Host as well, so I know, like and trust their service.
Follow along on BlueHost


1. Register your blog domain aka URL aka that stuff after www
Your domain name is how everyone finds you on the web. Some people refer to it as your URL (universal record location) and some refer to it as your address. Just like your home, it really is your address to your little space on the internet, and what you choose is important.
Try to choose a name that is simple, easy to spell, memorable and relevant to what you are going to be writing about. When I chose the name of my blog, I specifically wanted something whimsical but memorable, so, this is what I ended up with. But I’ve had other blogs over the years with better names.
I used to actively run and update a blog located at mytenantfromhell.com. Guess what they website was about? Yep, it was about really bad tenants and it was super easy to remember. When you choose a web address, don’t choose one just for you; choose one that your readers will easily come back to. Also, for search engine purposes, one school of thought is that having a URL that has your website’s keywords may help you rank higher when those keywords are used as search terms.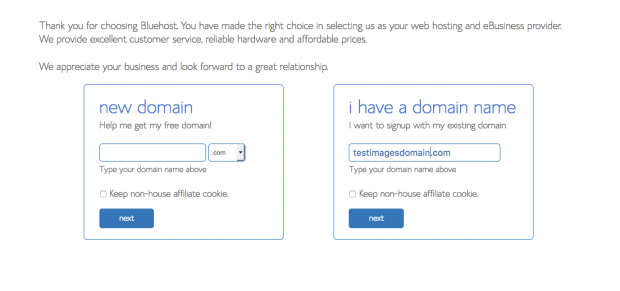

Now, if you do already have a URL, Blue Host will allow you to sign up using that existing name. Blue Host will still house all of your files, however, it will tell your domain company to point your URL to their files when someone types in your website address. It’s all pretty seamless on the back end.
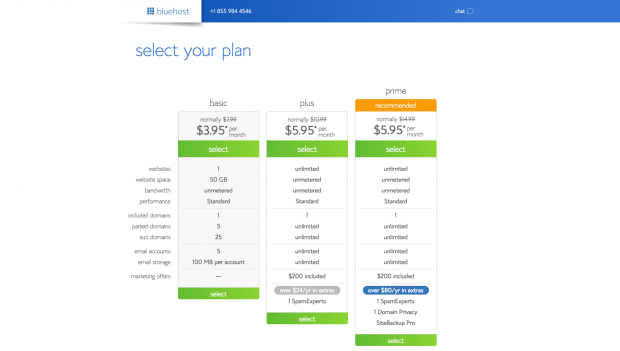
2. Choose Your Hosting Plan
Blue Host offers three different levels of service for hosting your files. You can choose the Basic Plan which comes with one website plus your own e-mail and the ability to create subdomains (you won’t need that just yet). The other plans allow you to have multiple websites under your hosting plan (although you’ll need to purchase more URL’s), unlimited e-mail address, plus some privacy and marketing tools.
The plans above the Basic Package cost more and frankly, you won’t need the additional tools as a beginner. Since I want you to start your website as frugally as possible, you should choose the Basic Plan as this is more than sufficient to begin your website. If you’re running a professional blog, you will want the integrated e-mail address. Some service force you to pay an additional fee for this, however, it is included in your Blue Host package for free. This will allow people to e-mail you at youremail@yourwebsite.com which gets you off of Gmail and other services. You will need this in the future as we begin marketing.

When I first started my blog back in 2009, these integrated services were super expensive. In order to make things cost effective, I went all over the place paying different companies for each service. I had my URL registered one place, then my hosting was at another place, and then I had to pay for e-mail on top of it.
With Blue Host you’ll have everything in one simple place, and best of all, you can pay as little as $3.95 per month for the entire package if you choose three years of hosting or more.
As a beginner, it’s very hard to say whether you will want to blog for that long. When I first started out in 2009, it was just a fun hobby that I didn’t envision lasting for more than a year or two. Fast forward to years later and here I am, still writing! My one year hosting plans have now evolved into three year hosting plans so that I can lock in the lowest rates.
My recommendation though, for you, is to sign up for one year. If things are going great, you can always come back and renew your plan for a longer period. Don’t worry about losing your website because your plan will automatically renew every year, and you will have an opportunity to cancel if needed.
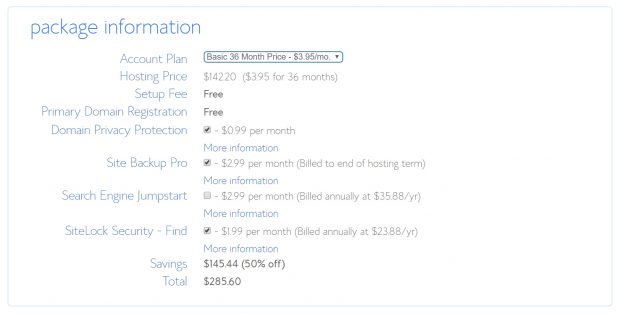

On the sign-up page, you will be presented with a number of options including domain privacy (more on that below), Site Backup Pro, Search Engine Jumpstart and SiteLock. I don’t believe that any of these options are critical when you are first starting out, so you can go ahead and uncheck everything except Domain Privacy Protection. Why? Well, unless you would like someone to be able to view your name and home address, you will want this checked.
Everything on the internet isn’t as anonymous as it may seem. When you register your domain, your payment information is used to list you as the site owner. That is currently a matter of public records and you can view the owners for any website simply by going to a site like WhoIs and typing in the URL.
This kind of search will show you who has registered the site, their contact information, the registration company used, the hosting company’s server addresses and when your registration expires. The only part that you can control is your name, address, and phone number. By choosing to register privately, only your hosting company’s information will be shown. This is critical and costs only $0.99 extra per month, so don’t skip it!
You should know that Blue Host does charge for the full year up front. This is important so that your website stays up and running without interruptions. Plus, it’s easier for me to know how much I have to make just to break even. Once I’ve made that money for the year, anything extra is actually income!
Now, if you’re confused before buying your plan and want to make sure that you’re doing it correctly, drop me a line and I’ll walk you through the process. There’s also a video tutorial that many have found to be super helpful.
3. Install WordPress
Once you have followed the steps above to sign up for your site, you can begin building right away, and I seriously mean that. I had created an awesome video showing you how to install WordPress, however, Blue Host has recently updated to make things even easier for you. Now, your WordPress installation is just a few clicks away.
Once you have created a password and logged into your site, you will be presented with options for a website theme. That is what determines how your website looks and you can get a very professional looking site created quickly. I’ll let you in on a little secret. One of the free themes offered is called Zerif Lite. Guess who uses that exact theme? Me. That is what this website is built on. With a few updates, I’m running a blog that literally makes thousands of dollars each year and it looks like I built it from scratch when I didn’t.
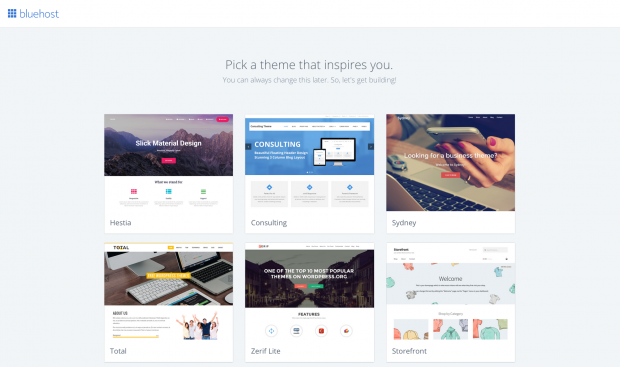

Don’t get too hung up on a theme because you can make your themes a million times for free. One of the reasons why I love WordPress is because it comes with so many different themes that you don’t need to pay for. Just choose one for now so that you can see what your website will look like.
If you don’t want to pick a theme, no biggie, you can just scroll on by to skip that step. Remember, you can always choose or change a theme later. If you are a coding master, you can also always code your own theme or hire a developer to do it for you. Since we’re just starting out, free is perfectly fine. Remember, that’s what I’m using right now.
Once you click on “Start Building”, Blue Host will install WordPress for you and you’re off to the races. Want to know how you’ve launched your blog, simple, you’ll see a welcome screen for WordPress asking if you would like to set up a “Business” or “Personal” site. You choose what works best for you! once you’re all set, you will be presented with a screen asking if you would like to add content to your website. Guess what? You now have a blog!

Working in WordPress can seem intimidating at first, but there is a reason why 29% of the entire internet runs of WordPress. It’s easy to use, can help you build professional websites, is easy to update, and can be super cheap to run.
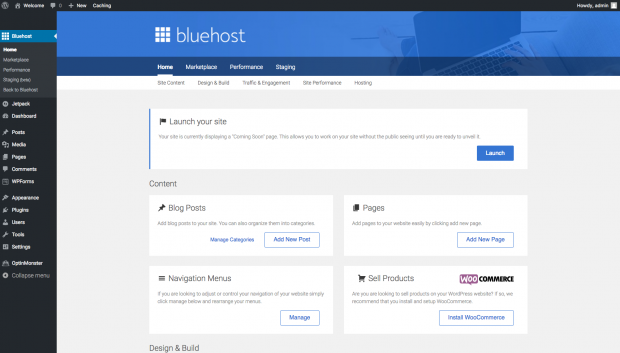
If you have never had a website before, there are some things to remember:
- Whether you have a company or personal blog, an “About” page is critical! Add one so that your readers will get to know who you are. Also, be sure to add a “Contact” page as well so that people can contact you!
- Your front page might not be the first one that people see! They can find different pages on your site through search engines so make sure your blog posts and pages are not neglected.
- You’ll be tempted to spend a lot of time building your landing page, however, I think that it’s more critical for you to focus on your first 20 blog posts, so write those first. Remember, you can always do the design on your page later.
- Speaking of design, you can always change your design for free at any time, or you can pay for a premium theme. To change your theme, go to “Appearance” on the left side and then “Themes”.
- Depending on the theme that you have chosen, you may have sidebars which can also be customized. You can add widgets and things by going to “Appearance” and then select “Widgets”.
- You can add “Plugins” just like you can add apps onto your phone. Plugins do all sorts of things and are super helpful. I’m going to recommend Jetpack as one of the first plugins for your to install. It’ll help you see your stats and it has other useful tools. You can always uninstall it later.
You’re off to the races! Soon, we’ll learn about tools that you can use for your blog such as things to help you collect e-mail address which is critical to future monetization.
If you like this tutorial, please consider signing up through my link. Oh, and if you want to save even more money, currently $10, sign up for eBates first, install the extension in your browser and then go sign up through Blue Host. Good luck!


